Sunday, July 10, 2022

V2EX - 技术

V2EX - 技术


账户验证真的上头

Posted: 10 Jul 2022 01:31 PM PDT

已经设置了 TOTP ,就因为安卓备用机登录了账户,死活必须让验证(那你还弹出 TOTP 让我验证干叼),都关机半月了,本机也没暂停过使用服务,就这么智障??都能和国内大厂一拼了。

如果 TOTP 不能作为验证手段,那就关了吧。

而且开机的 IOS 就这么视而不见??

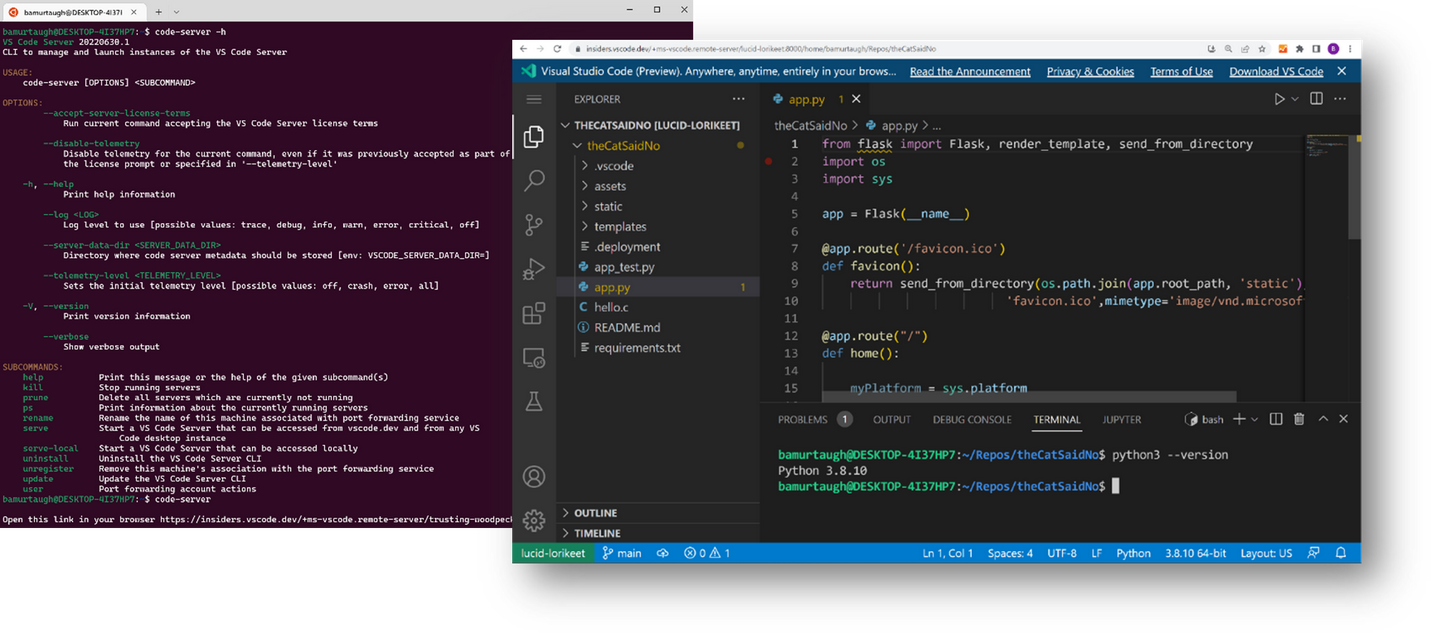
微软发布 VS Code Server 了~ 目前是 private preview 阶段

Posted: 10 Jul 2022 11:41 AM PDT

最近,微软在 VS Code 官方博客中宣布了 Visual Studio Code Server !

远程开发的过去与未来

2019 年,微软发布了 VS Code Remote ,开启了远程开发的新时代

2020 年,微软发布了 GitHub Codespaces —— 一个全托管的远程开发解决方案。

如今,Visual Studio Code Server 来了!

什么是 VS Code Server ?

Visual Studio Code Server 是一项可以在远程开发机器上运行的服务,例如桌面 PC 或者虚拟机 (VM)。它允许开发者通过 vscode.dev URL 从任何地方安全地连接到这个远程计算机,而且不需要通过 SSH 。

目前,微软发布了 private preview 版本的 VS Code Server ,以及一个可以轻松安装、更新、管理和连接到 VS Code Server 服务的 CLI ( code-serverCLI )。开发者可以将服务器安装在您喜欢的任何位置(比如本地的开发机器、云端的虚拟机等),并使用 VS Code for Web ( vscode.dev )通过浏览器安全地访问它,而无需进行设置 SSH 或 https 。

目前,code-serverCLI 是区别于 codeCLI 的一个独立的 CLI 。未来,codeCLI 将会统一,让开发者可以同时管理桌面和服务器。

架构

VS Code Server 的 CLI 在 VS Code 客户端 (vscode.dev) 和你的远程计算机之间建立隧道。隧道( Tunneling )也被称为端口转发,将数据从一个网络安全地传输到另一个网络。

VS Code Server 包括以下两个核心组件:

  • VS Code 服务器:运行在远程机器上的后端服务器,以及一个便于安装、更新、管理和连接到 VS Code 服务器的 CLI 。
  • Remote-Server 扩展:它会被自动加载到本地的 VS Code 客户端,方便连接到远程机器。

使用场景

VS Code Server 允许开发者以新的方式使用 VS Code ,例如:

  • 在 SSH 支持可能受限的远程计算机上进行开发,或者你需要基于 Web 进行访问。
  • 在不支持安装桌面版 VS Code 的机器上进行开发,比如 iPad/平板电脑 或者 Chromebook 。
  • 体验所有代码都可以在浏览器沙箱中执行的安全优势。

注册申请

目前 VS Code Server 还处于 private preview 阶段,可以访问下面的链接进行注册申请:

https://aka.ms/vscode-server-signup


原文链接: https://zhuanlan.zhihu.com/p/539411629

吐槽:到底什么是“优雅”? PHP 的新名词真是含义莫名……

Posted: 10 Jul 2022 10:16 AM PDT

本周工作日的某一天,

翻开一篇博客园文章:"……这样写更优雅……"、

打开一篇 Laravel 某个特性的介绍:"……这个框架……以优雅著称……"。

优雅到底是什么?小布尔乔亚?是我漏了什么吗?

去逛 Stackoverflow 、去大佬们的独立博客、去 Github 讨论问题,大家都直接讲"稳定"、"安全"、"性能"、"可读性"、"模块化"……

我记得,Yii2 那时的 Slogan 是 "安全、稳定、高效",现在竟然给我一种"都在吹优雅"的感觉。

( Ps:上一次给我留下印象的"优雅",还是小红书里的名媛)

通过 oss 自建 nas 的方案是否可行?

Posted: 10 Jul 2022 09:55 AM PDT

购买新加坡或者香港轻量云服务器 24 RMB/月
通过 ossfs 把 bucket 挂载到轻量云
在轻量云启用文件共享服务

轻量云新加坡套餐 https://share.mebtte.com/Xnip2022-07-09_18-53-19.png

首先 oss 走内网是不需要流量费的
轻量云已经包含了 1T 流量 网速也有 4mb/s 左右
加上轻量云自带 ip 可以公网访问

上面的方案基本只需要付 oss 的存储费用 请求次数费用基本可以忽略
不过一直没搞懂 oss 怎么算存储费用的 又流量包又按量计费的

比如我要存 4t 的数据 一年大概多少钱?

夏天室外用手机烫的吓人怎么办

Posted: 10 Jul 2022 09:41 AM PDT

中午出去吃饭,路上看两眼都烫得吓人,放兜里还怕炸了,可那却是唯一降温的办法?不知道有没有别的方案,搞个黑域啥的会好吗?

头条搜索(m.toutiao.com)最近攻占了 Google 中文结果页?

Posted: 10 Jul 2022 09:38 AM PDT

最近用 Google 搜中文内容几乎每次都能看到头条搜索的结果,而且点进去之后不能直接看到内容,而是把关键词带过去,显示他们自家的搜索结果。说实话,给出来的结果也没有点击的欲望,只觉得很奇怪,这又是什么奇技淫巧?

比如我 Google 搜索"生火",第一页就能看到头条的搜索结果 https://i.v2ex.co/0ze8QQI8.jpeg

点进去之后就是头条自家的搜索界面 https://i.v2ex.co/D1isC754.jpeg

他家网站在中文内容区权重还挺高的,不过这导流风格有点像 kknews 这一类的内容农场。

六年前端准备重学 JS,有啥路线吗?

Posted: 10 Jul 2022 09:12 AM PDT

RT

一开始从培训班出来的

混到到现在业务代码没问题

感觉遇到瓶颈期了

期间觉得自己基础不扎实

想重学 JS 及其周边技术

给自己半年时间

麻烦老哥们个路线


(防吐槽

请问 VS Code 深色主题背景色如何设置为纯色?

Posted: 10 Jul 2022 08:12 AM PDT

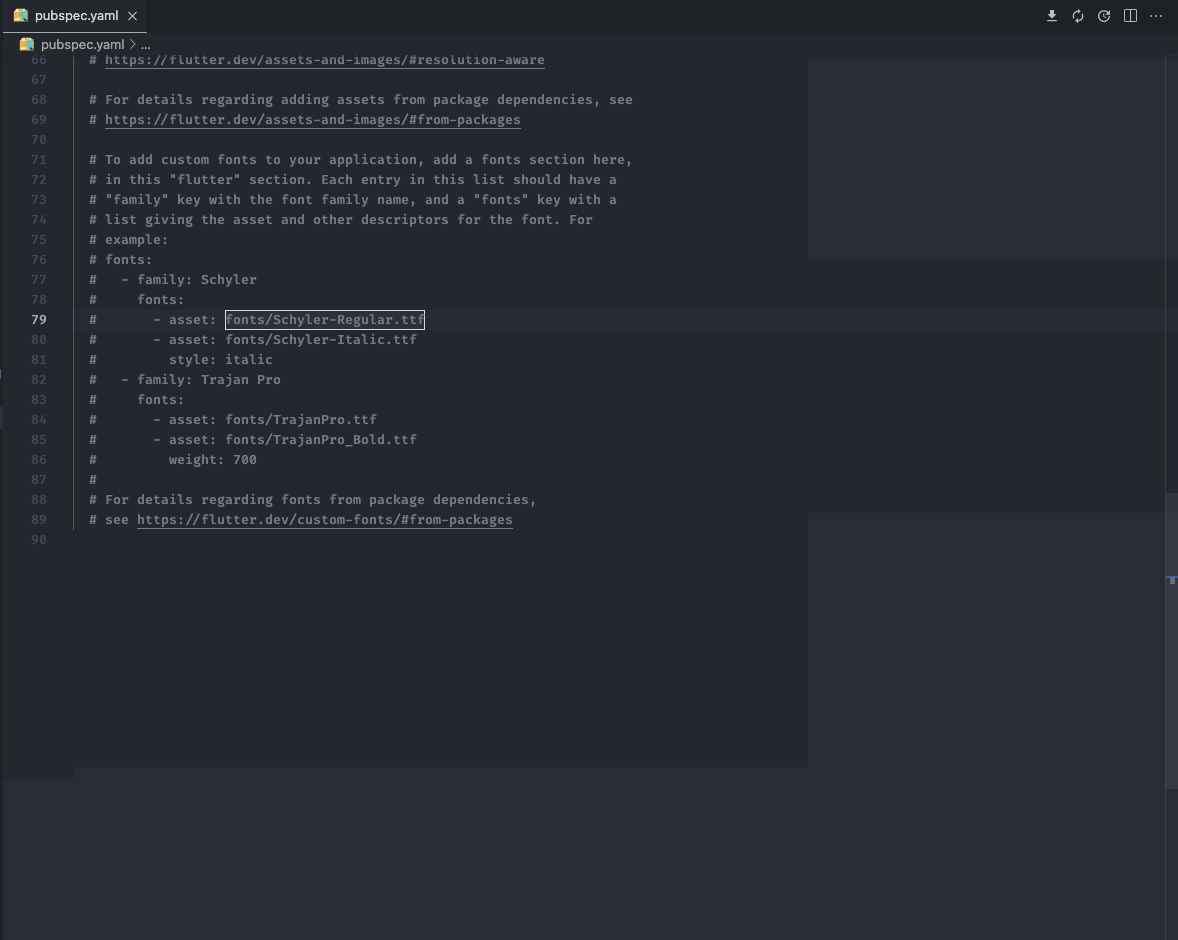
很长时间没用 VS Code ,今天打开升了个级后发现所有的深色主题背景色都变成下图这样了。Line number 和 Editor 都没对齐,这是个什么 feature ?我记得以前是纯色的?

vscode.png

只在大屏幕上面,13" 笔记本上无此现象。

trzsz.js 发布了新版本,浏览器和 tabby 都支持拖目录直接上传了。

Posted: 10 Jul 2022 05:41 AM PDT

trzsz.js 项目地址: https://github.com/trzsz/trzsz.js

在浏览器中使用以下代码,即可实现拖文件和目录上传。

terminalHtmlElement.addEventListener("dragover", (event) => event.preventDefault()); terminalHtmlElement.addEventListener("drop", (event) => {   event.preventDefault();   trzszFilter     .uploadFiles(event.dataTransfer.items)     .then(() => console.log("upload success"))     .catch((err) => console.log(err)); }); 

需要在服务器上安装 trzsztrzsz-go ,将 trz 程序放到某个 PATH 路径下即可。

tabby 终端安装一个插件就可以用了(需要在配置中启用拖文件和目录的功能)。 插件项目地址: https://github.com/trzsz/tabby-trzsz

git 有没有必要专门拉一个分支来放标签?

Posted: 10 Jul 2022 05:37 AM PDT

我看有的地方除了有一个 release 分支之外,还专门开了一个 tag 或 master 分支来放 Tag 。

那么,为什么不直接在 release 分支上打 tag 就好了?少一个分支,这样还更省事?

请教个问题,将 excel 中的数据生成折线图并保存在 excel 中,要求手动打开 excel 时还可以操作该折线图

Posted: 10 Jul 2022 04:21 AM PDT

各位大佬,我现在需要根据 excel 中的某些数据生成折线图,然后将折线图保存到该 sheet 中。网上的方式都是 save 到本地或 io 里,保存成一个图片,再插入到 excel 。但是我的需求是插入到 excel 的图表还能操作,比如显示数据标签,数据表。请教下该怎么操作?

比如:

import pandas as pd

df = pd.read_excel(".SS.xlsx")

df.plot(x=["test-row"], y=["test_col"])

plt.save("test.jpg")

plt.close()

worksheet = writer.sheets["sheet"]

worksheet.insert_image("C2", r".\test.jpg")

请教下大佬们, swiftUI 菜单栏应用 onHover 事件触发问题

Posted: 10 Jul 2022 02:57 AM PDT

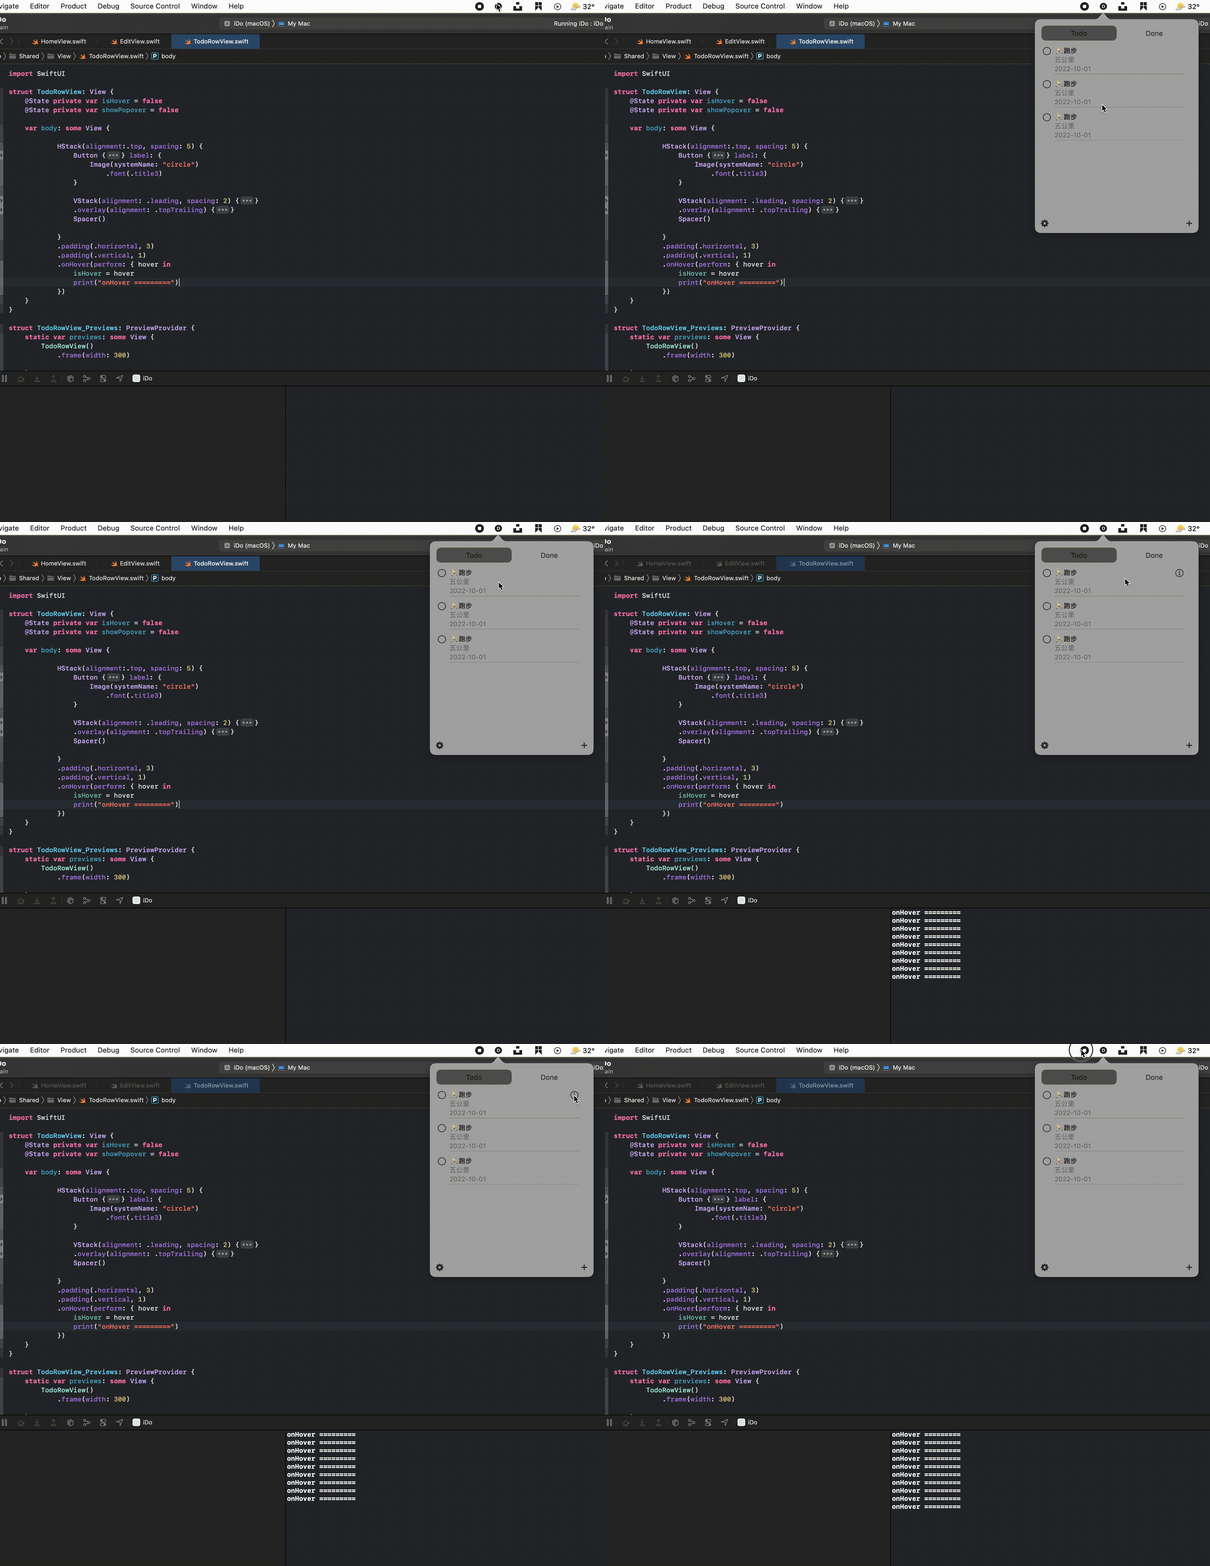
刚学习 swift 和 swiftUI 不久,目前在试着用 swiftUI 做一个纯菜单栏的 todolist 工具。现在调界面的时候碰到个问题:点击图标弹出应用后,子视图上 TodoRowView 的 onHover 事件无法触发,必须要点击一下弹出的这块区域才可以,请教下这个问题的解决办法,不胜感激🙏

主视图结构大概是

struct HomeView: View {     var body: some View {         VStack {             CustomSegmentedControl()                          ScrollView {                 TodoRowView()                 TodoRowView()                 TodoRowView()             }             HStack {                 xxxx..             }         }     } }  

问题如下:

out.gif

Nestjs 最佳实践教程:4 排序,分页与过滤

Posted: 09 Jul 2022 09:59 PM PDT

另,本人在找工作中,希望能有远程工作匹配(无法去外地),有需要的老板可以看一下我的个人介绍: https://pincman.com/about

学习目标

  • 重载 TreeRepository 自带方法来对树形结构的数据进行扁平化处理
  • 对 Typeorm 查询出的数据列表进行分页处理
  • 通过请求中的 query 查询对数据进行筛选处理,比如排序,过滤等
  • 实现发布文章和取消发布的功能
  • Typeorm 模型事件和 Subscriber(订阅者)的使用
  • 使用sanitize-html对文章内容进行防注入攻击处理

预装依赖

~ pnpm add nestjs-typeorm-paginate sanitize-html deepmerge && pnpm add @types/sanitize-html -D 

文件结构

创建文件

cd src/modules/content && \ mkdir subscribers && \ touch dtos/query-category.dto.ts \ dtos/query-post.dto.ts \ subscribers/post.subscriber.ts \ subscribers/index.ts \ services/sanitize.service.ts \ && cd ../../../ 

与上一节一样,这一节的新增和修改集中于ContentModule

src/modules/content ├── constants.ts ├── content.module.ts ├── controllers │   ├── category.controller.ts │   ├── comment.controller.ts │   ├── index.ts │   └── post.controller.ts ├── dtos │   ├── create-category.dto.ts │   ├── create-comment.dto.ts │   ├── create-post.dto.ts │   ├── index.ts │   ├── query-category.dto.ts │   ├── query-post.dto.ts │   ├── update-category.dto.ts │   └── update-post.dto.ts ├── entities │   ├── category.entity.ts │   ├── comment.entity.ts │   ├── index.ts │   └── post.entity.ts ├── repositories │   ├── category.repository.ts │   ├── comment.repository.ts │   ├── index.ts │   └── post.repository.ts ├── services │   ├── category.service.ts │   ├── comment.service.ts │   ├── index.ts │   ├── post.service.ts │   └── sanitize.service.ts └── subscribers     ├── index.ts     └── post.subscriber.ts 

应用编码

这节多了一个新的概念,即subscriber,具体请查阅typeorm文档,当然你也可以在模型中使用事件处理函数,效果没差别

模型

CategoryEntity

代码:src/modules/content/entities/category.entity.ts

  • 添加order字段用于排序
  • 添加level属性(虚拟字段)用于在打平树形数据的时候添加当前项的等级

PostEntity

代码: src/modules/content/entities/post.entity.ts

type字段的类型用enum枚举来设置,首先需要定义一个PostBodyTypeenum类型,可以添加一个constants.ts文件来统一定义这些enum和常量

  • 添加publishedAt字段用于控制发布时间和发布状态
  • 添加 type字段用于设置发布类型
  • 添加customOrder字段用于自定义排序

存储类

CategoryRepository

代码: src/modules/content/repositories/category.repository.ts

因为CategoryRepository继承自TreeRepository,所以我们在typeorm源码中找到这个类,并对部分方法进行覆盖,如此我们就可以对树形分类进行排序,覆盖的方法如下

当然后面会讲到更加深入的再次封装,此处暂时先这么用

  • findRoots 为根分类列表查询添加排序
  • createDescendantsQueryBuilder 为子孙分类查询器添加排序
  • createAncestorsQueryBuilder 为祖先分类查询器添加排序

DTO 验证

新增QueryCategoryDtoQueryPostDto用于查询分类和文章时进行分页以及过滤数据和设置排序类型等

在添加DTO之前,现在添加几个数据转义函数,以便把请求中的字符串改成需要的数据类型

// src/core/helpers.ts  // 用于请求验证中的 number 数据转义 export function tNumber(value?: string | number): string |number | undefined // 用于请求验证中的 boolean 数据转义 export function tBoolean(value?: string | boolean): string |boolean | undefined // 用于请求验证中转义 null export function tNull(value?: string | null): string | null | undefined 

修改create-category.dto.tscreate-comment.dto.tsparent字段的@Transform装饰器

export class CreateCategoryDto { ...     @Transform(({ value }) => tNull(value))     parent?: string; } 

添加一个通用的DTO接口类型

// src/core/types.ts  // 分页验证 DTO 接口 export interface PaginateDto {     page: number;     limit: number; } 

QueryCategoryDto

代码: src/modules/content/dtos/query-category.dto.ts

  • page属性设置当前分页
  • limit属性设置每页数据量

QueryPostDto

除了与QueryCateogryDto一样的分页属性外,其它属性如下

  • orderBy用于设置排序类型
  • isPublished根据发布状态过滤文章
  • category过滤出一下分类及其子孙分类下的文章

orderBy字段是一个enum类型的字段,它的可取值如下

  • CREATED: 根据创建时间降序
  • UPDATED: 根据更新时间降序
  • PUBLISHED: 根据发布时间降序
  • COMMENTCOUNT: 根据评论数量降序
  • CUSTOM: 根据自定义的order字段升序

服务类

SanitizeService

代码: src/modules/content/services/sanitize.service.ts

此服务类用于clean html

sanitize方法用于对 HTML 数据进行防注入处理

CategoryService

代码:src/modules/content/services/category.service.ts

添加一个辅助函数,用于对打平后的树形数据进行分页

// src/core/helpers.ts export function manualPaginate<T extends ObjectLiteral>(     { page, limit }: PaginateDto,     data: T[], ): Pagination<T> 

新增paginate(query: QueryCategoryDto)方法用于处理分页

async paginate(query: QueryCategoryDto) {     // 获取树形数据     const tree = await this.findTrees();     // 打平树形数据     const list = await this.categoryRepository.toFlatTrees(tree);     // 调用手动分页函数进行分页     return manualPaginate(query, list); } 

PostService

代码:src/modules/content/services/post.service.ts

  • getListQuery: 用于构建过滤与排序以及通过分类查询文章数据等功能的query构建器
  • paginate: 调用getListQuery生成query,并作为nestjs-typeorm-paginate paginate的参数对数据进行分页
async paginate(params: FindParams, options: IPaginationOptions) {     const query = await this.getListQuery(params);     return paginate<PostEntity>(query, options); } 

订阅者

PostSubscriber

代码: src/modules/content/subscribers/post.subscriber.ts

  • beforeInsert(插入数据前事件): 如果在添加文章的同时发布文章,则设置当前时间为发布时间
  • beforeUpdate(更新数据前事件): 更改发布状态会同时更新发布时间的值,如果文章更新为未发布状态,则把发布时间设置为 null
  • afterLoad(加载数据后事件): 对 HTML 类型的文章内容进行去标签处理防止注入攻击

一个需要注意的点是需要在subcriber类的构造函数中注入Connection才能获取链接

   constructor(         connection: Connection,         protected sanitizeService: SanitizeService,     ) {         connection.subscribers.push(this);     } 

注册订阅者

把订阅者注册成服务后,由于在构造函数中注入了connection这个连接对象,所以typeorm会自动把它加载到这个默认连接的subscribers配置中

// src/modules/content/subscribers/post.subscriber.ts import * as SubscriberMaps from './subscribers'; const subscribers = Object.values(SubscriberMaps); @Module({     ....     providers: [...subscribers, ...dtos, ...services], }) 

控制器

CategoryController

代码: src/modules/content/controllers/category.controller.ts

  • list: 通过分页来查找扁平化的分类列表
  • index: 把 url 设置成 @Get('tree')
    @Get()     // 分页查询     async list(         @Query(             new ValidationPipe({                 transform: true,                 forbidUnknownValues: true,                 validationError: { target: false },             }),         )         query: QueryCategoryDto,     ) {         return this.categoryService.paginate(query);     }      // 查询树形分类     @Get('tree')     async index() {         return this.categoryService.findTrees();     } 

PostController

代码: src/modules/content/controllers/post.controller.ts

修改index方法用于分页查询

// 通过分页查询数据 async index(         @Query(             new ValidationPipe({                 transform: true,                 forbidUnknownValues: true,                 validationError: { target: false },             }),         )         { page, limit, ...params }: QueryPostDto,     ) {         return this.postService.paginate(params, { page, limit });     } 

关于 TrueNAS Scale 安装 nastool 的权限问题求助

Posted: 09 Jul 2022 09:50 PM PDT

在 TrueNAS Scale 上用社区 custom app 安装了 nastool ,想用来自动追剧等, 但是目前遇到 qbit 下载的资源无法自动同步到硬链之后的媒体文件夹

如果 TrueNAS 安装的时候,runAsUser 这几个选项设置为我的 NAS 文件夹权限所有者的 id(1000),程序会遇到 operation not permitted


如果将 runAsUser 这几个选项设置为 0 ,即用 root 用户启动是可以将 nastool 跑起来的,但是选择手动同步目录的时候,日志查看会显示 Permission denied ,无法将下载的电影文件移动到指定文件夹


以为是文件夹权限,尝试过将 qbit 目录和硬链接后的目录 chmod 777 但是也没办法解决,现在卡住了,nastool 能够正常订阅下载电影文件,但是无法将视频文件自动整理到对应的文件夹

自己制作了一套 React18+Nestjs 的全栈开发教程

Posted: 09 Jul 2022 07:40 PM PDT

本教程部分视频也会在 V2EX 更新

本人从 08 年到 18 年一直从事于 PHP 的开发。从 18 年开始转向 Typescript+React+Nestjs 的技术栈。目前来说 React 应该是一个非常好用的前端框架,生态非常完善,并且十分灵活简单。Nestjs 则是 Node.js 中唯一且无敌存在的后端 web 框架。因为我个人从事这套技术栈开发已经 4 年多,所以颇有心得,做了这套 React18 视频教程和 Nestjs 实战视频教程。现在视频教程也是刚刚开始做了一部分,还在持续更新。使用 TS 全栈开发可以基本涵盖各种平台的方方面面,比如开发桌面应用的 Electron,开发小程序的 Taro,开发 Spa 中后台的 React ,开发 SSR 网站的 next.js ,开发移动应用的 React Native,开发 CLI 的 Yargs,以及开发后端的 Nestjs 。

基本学会一套,全面够用,再加上 Monorepo 组织结构,一个仓库所有平台都可以搞定。

我制作的这个 TS+React18+Nestjs 的全栈开发体系类的实战教程,包括周边的 Electron,RN,Taro 等都会讲解,当然不包含 TS 或 ES6 基础语法这些网上文档满天飞的,主要是以项目实际开发为主,所以每套子教程都命名成最佳实践,比如《 React18 最佳实践》,《 Nestjs 最佳实践》等,想要学习的同学可以在我的小站哦平克小站或者平克教程里学习,有问题也可以加群讨论。

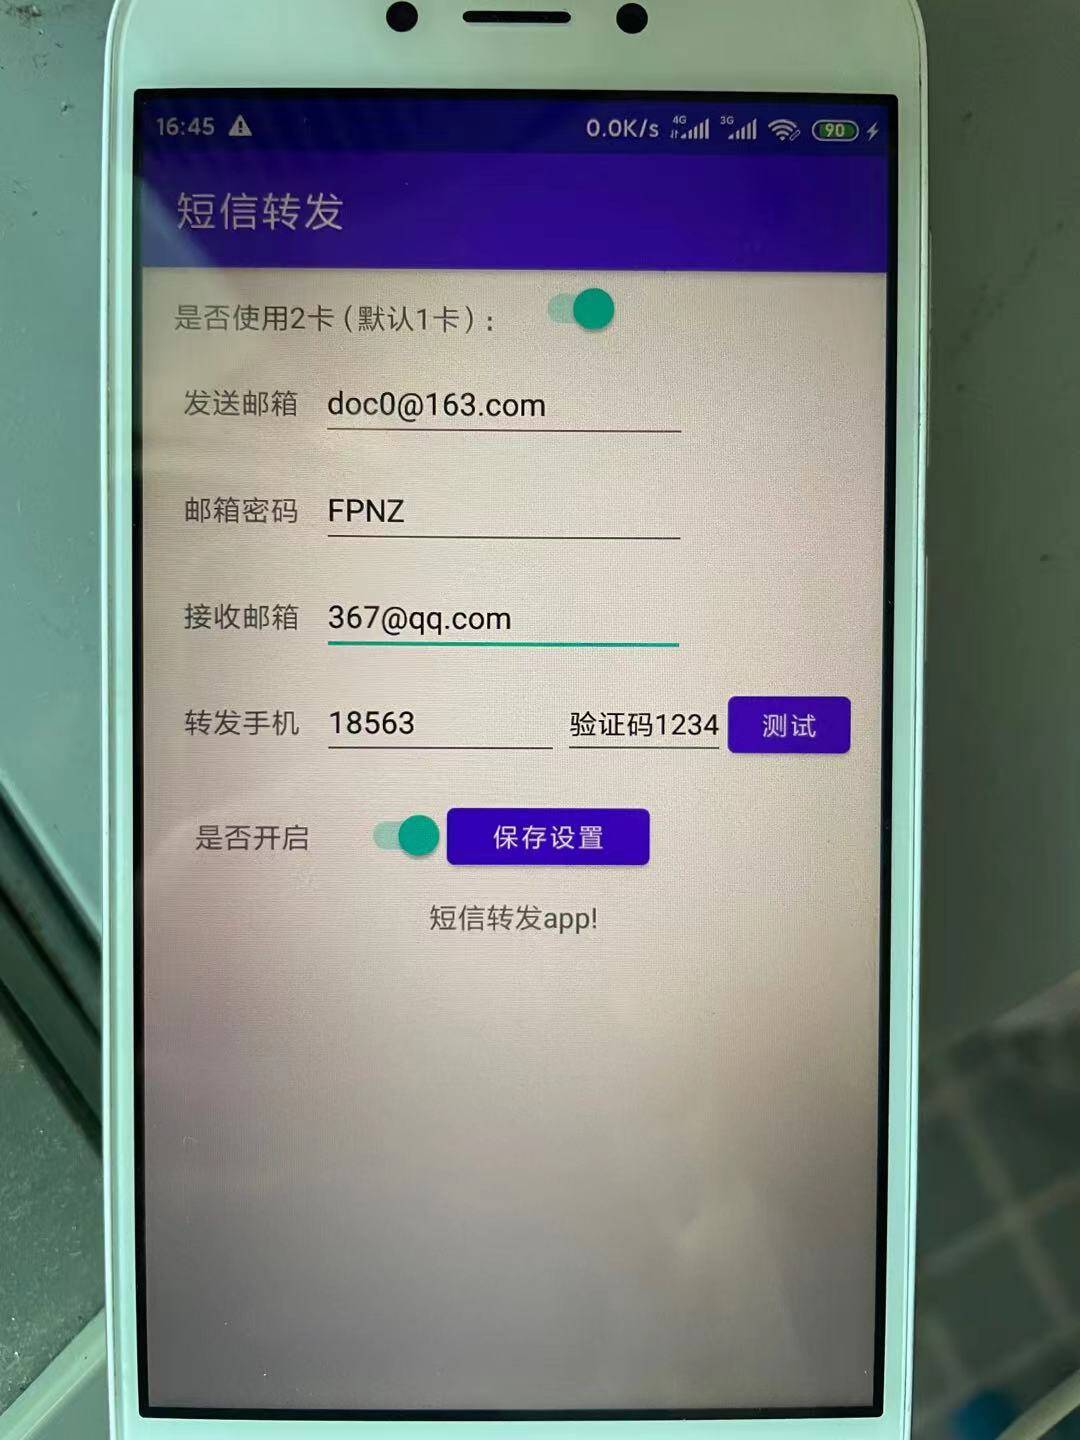
安卓短信转发 app,方便多卡手机用户

Posted: 09 Jul 2022 07:39 PM PDT

背景

很久以前 iphone 是没有双卡,至今 iPhone 还有不少版本是单卡的,所以双卡的小伙伴就头大了。到现在我还是单卡的 iphone 。。。美版的便宜没办法。这个转发短信的 app 很久以前就做了,但是一直没有分享出来,因为 subId 一直会变,不同的手机是不一样的,可能无法适配。最近换红米 5a ,又重新研究下代码,发现其实是可以动态获取到的。今天把它简单完善了一下,把一些写死的东西重新搞了一下。

赶紧收藏哈,不然帖子沉没就没啦。支持安卓 8 以上把(应该支持安卓 7 ),推荐小米手机,红米手机,三星手机都可以,红米 5a-100 块钱,还能再放一个物联网流量卡,家里的都不用安装宽带,非常的划算。魅族肯定不行,卡片短信没法获取到,其他的手机没测试过,应该问题不大。

代码地址: https://github.com/traceless/sendsms

需要编译好的话,我下次编译好放上去。一般这玩意建议自己编译。

app 说明

  • 支持来电通知-短信转发,电话来了就会自动转发一条消息到你手机上,当然我的是呼叫转移就没啥必要了。
  • 目前只有验证码才会发短信到手机上,普通的短信只会发邮件到你的邮箱中。
  • 有做短信发送限制,避免遇到大坑导致短信疯狂消耗。
  • 其他的功能,自己加吧。代码很简单,有代码基础即可完成,照着写就好了。

建议用 QQ 邮箱,这样微信可以直接看到邮箱的消息,挺方便的。我这个发送的邮箱是使用 163 的,最近有坑,不能用密码了,只能用授权的密码。

注意事项

163 邮箱无法发送邮件的问题; https://blog.csdn.net/weixin_38611617/article/details/115999647

需要去获取 163 的授权密码,要用其他的邮箱,自己写一个就完事了,问题不大,到处都是。

有问题可以留言,有发现 bug 也可以告知一下,记得点个赞哈、

数据库应该使用单独列存储计数吗?

Posted: 09 Jul 2022 06:36 PM PDT

问题描述

一个学校有 N 个班级,一个班级有 N 个学生。

  • 在展示学校列表的时候,需要展示该学校的班级数量、学生数量
  • 在展示班级列表的时候,需要展示该班级的学生数量

以下两种方式如何选择:


1.使用单独列

学校表使用 classesCountstudentsCount 两个列来分别存储该校班级数量、该校学生数量,在班级表中使用 studentsCount 列存储该班学生数量。

班级实体增、删时,更新学校表的 classesCount 列;在学生实体增、删时,更新班级表及学校表的 studentsCount 列。

2.使用数据库查询

班级数量和学生数量由数据库查询获得。

select * from cmapus; select count(*) as classesCount from classes group by campus_id; select count(*) as studentsCount from students group by campus_id; 

方式一在增、删时需要做额外操作,会存在事务不能保证正确的情况吗?

方式二在数据量大的时候性能会很差吗?

额外提问

类似这种数据库设计问题,有推荐的书籍参阅吗?

Nestjs 最佳实践教程:3 模型关联与树形嵌套

Posted: 09 Jul 2022 03:19 PM PDT

另,本人在找工作中,希望能有远程工作匹配(无法去外地),有需要的老板可以看一下我的个人介绍: https://pincman.com/about

学习目标

这次教程在上一节的基础上实现一个简单的 CMS 系统,实现如下功能

  • 文章与分类多对多关联
  • 文章与评论一对多关联
  • 分类与评论的树形无限级嵌套

文件结构

这次的更改集中于ContentModule模块,编写好之后的目录结构如下

src/modules/content ├── content.module.ts ├── controllers │   ├── category.controller.ts │   ├── comment.controller.ts │   ├── index.ts │   └── post.controller.ts ├── dtos │   ├── create-category.dto.ts │   ├── create-comment.dto.ts │   ├── create-post.dto.ts │   ├── index.ts │   ├── update-category.dto.ts │   └── update-post.dto.ts ├── entities │   ├── category.entity.ts │   ├── comment.entity.ts │   ├── index.ts │   └── post.entity.ts ├── repositories │   ├── category.repository.ts │   ├── comment.repository.ts │   ├── index.ts │   └── post.repository.ts └── services     ├── category.service.ts     ├── comment.service.ts     ├── index.ts     └── post.service.ts 
cd src/modules/content && \ touch controllers/category.controller.ts \ controllers/comment.controller.ts \ dtos/create-category.dto.ts \ dtos/create-comment.dto.ts \ dtos/update-category.dto.ts \ entities/category.entity.ts \ entities/comment.entity.ts \ repositories/category.repository.ts \ services/category.service.ts \ services/comment.service.ts \ && cd ../../../ 

应用编码

编码流程与上一节一样,entity->repository->dto->service->controller,最后注册

模型类

模型关联

分别创建分类模型(CategoryEntity)和评论模型(CommentEntity),并和PostEntity进行关联

分类模型

// src/modules/content/entities/category.entity.ts @Entity('content_categories') export class CategoryEntity extends BaseEntity {   ...     // 分类与文章多对多关联     @ManyToMany((type) => PostEntity, (post) => post.categories)     posts!: PostEntity[]; } 

评论模型

// src/modules/content/entities/comment.entity.ts @Entity('content_comments') export class CommentEntity extends BaseEntity {   ...    // 评论与文章多对一,并触发`CASCADE`     @ManyToOne(() => PostEntity, (post) => post.comments, {         nullable: false,         onDelete: 'CASCADE',         onUpdate: 'CASCADE',     })     post!: PostEntity; } 

文章模型

@Entity('content_posts') export class PostEntity extends BaseEntity {     // 评论数量     // 虚拟字段,在 Repository 中通过 QueryBuilder 设置     commentCount!: number;      // 文章与分类反向多对多关联     @ManyToMany((type) => CategoryEntity, (category) => category.posts, {         cascade: true,     })     @JoinTable()     categories!: CategoryEntity[];     // 文章与评论一对多关联     @OneToMany(() => CommentEntity, (comment) => comment.post, {         cascade: true,     })     comments!: CommentEntity[]; } 

树形嵌套

评论模型与分类模型的树形嵌套实现基本一致,唯一的区别在于在删除父分类时子分类不会删除而是提升为顶级分类,而删除评论则连带删除其后代评论

typeorm有三种方案实现树形嵌套模型,我们使用综合来说最好用的一种,即物理路径(Materialized Path),原因在于 Adjacency list 的缺点是无法一次加载整个树,而 closure 则无法自动触发Cascade

// src/modules/content/entities/category.entity.ts @Entity('content_categories') // 物理路径嵌套树需要使用`@Tree`装饰器并以'materialized-path'作为参数传入 @Tree('materialized-path') export class CategoryEntity extends BaseEntity {   ...     // 子分类     @TreeChildren({ cascade: true })     children!: CategoryEntity[];     // 父分类     @TreeParent({ onDelete: 'SET NULL' })     parent?: CategoryEntity | null; }      // src/modules/content/entities/comment.entity.ts @Entity('content_comments') @Tree('materialized-path') export class CommentEntity extends BaseEntity {     ...     @TreeChildren({ cascade: true })     children!: CommentEntity[];     @TreeParent({ onDelete: 'CASCADE' })     parent?: CommentEntity | null; }  

存储类

创建一个空的CategoryRepository用于操作CategoryEntity模型

注意:树形的存储类必须通过getTreeRepository获取或者通过getCustomRepository加载一个继承自TreeRepository的类来获取

nestjs中注入树形模型的存储库使用以下方法

  • 使用该模型的存储库类是继承自TreeRepository类的自定义类,则直接注入即可
  • 如果没有存储库类就需要在注入的使用TreeRepository<Entity>作为类型提示

为了简单,CommentRepository暂时不需要创建,直接注入服务即可

// src/modules/content/repositories/category.repository.ts @EntityRepository(CategoryEntity) export class CategoryRepository extends TreeRepository<CategoryEntity> {} 

修改PostRepository添加buildBaseQuery用于服务查询,代码如下

// src/modules/content/repositories/post.repository.ts buildBaseQuery() {         return this.createQueryBuilder('post')             // 加入分类关联             .leftJoinAndSelect('post.categories', 'categories')             // 建立子查询用于查询评论数量             .addSelect((subQuery) => {                 return subQuery                     .select('COUNT(c.id)', 'count')                     .from(CommentEntity, 'c')                     .where('c.post.id = post.id');             }, 'commentCount')             // 把评论数量赋值给虚拟字段 commentCount             .loadRelationCountAndMap('post.commentCount', 'post.comments');     } 

DTO 验证

DTO 类与前面的CreatePostDtoUpdatePostDto写法是一样的

评论无需更新所以没有update的 DTO

  • create-category.dto.ts用于新建分类
  • update-category.dto.ts用于更新分类
  • create-comment.dto.ts用于添加评论

在代码中可以看到我这里对分类和评论的 DTO 添加了一个parent字段用于在创建和更新时设置他们的父级

@Transform装饰器是用于转换数据的,基于class-transformer这个类库实现,此处的作用在于把请求中传入的值为null字符串的parent的值转换成真实的null类型

@ValidateIf的作用在于只在请求的parent字段不为null且存在值的时候进行验证,这样做的目的在于如果在更新时设置parentnull把当前分类设置为顶级分类,如果不传值则不改变

// src/modules/content/dtos/create-category.dto.ts     @IsUUID(undefined, { always: true, message: '父分类 ID 格式不正确' })     @ValidateIf((p) => p.parent !== null && p.parent)     @IsOptional({ always: true })     @Transform(({ value }) => (value === 'null' ? null : value))     parent?: string; 

CreatePostDto中添加分类 IDS 验证

// src/modules/content/dtos/create-post.dto.ts    @IsUUID(undefined, { each: true, always: true, message: '分类 ID 格式错误' })    @IsOptional({ always: true })    categories?: string[]; 

CreateCommentDto中添加一个文章 ID 验证

// src/modules/content/dtos/create-comment.dto.ts     @IsUUID(undefined, { message: '文章 ID 格式错误' })     @IsDefined({ message: '评论文章 ID 必须指定' })     post!: string; 

服务类

Category/Comment

服务的编写基本与PostService一致,我们新增了以下几个服务

  • CategoryService用于分类操作
  • CommentService用于评论操作

分类服务通过TreeRepository自带的findTrees方法可直接查询出树形结构的数据,但是此方法无法添加查询条件和排序等,所以后续章节我们需要自己添加这些

// src/modules/content/services/category.service.ts export class CategoryService {     constructor(         private entityManager: EntityManager,         private categoryRepository: CategoryRepository,     ) {}      async findTrees() {         return this.categoryRepository.findTrees();     }     ... 

getParent方法用于根据请求的parent字段的ID值获取分类和评论下的父级

protected async getParent(id?: string) {         let parent: CommentEntity | undefined;         if (id !== undefined) {             if (id === null) return null;             parent = await this.commentRepository.findOne(id);             if (!parent) {                 throw new NotFoundException(`Parent comment ${id} not exists!`);             }         }         return parent;     } 

PostService

现在为了读取和操作文章与分类和评论的关联,使用QueryBuilder来构建查询器

在此之前,在core/types(新增)中定义一个用于额外传入查询回调参数的方法类型

// src/core/types.ts  /**  * 为 query 添加查询的回调函数接口  */ export type QueryHook<Entity> = (     hookQuery: SelectQueryBuilder<Entity>, ) => Promise<SelectQueryBuilder<Entity>>; 

PostService更改

对于评论的嵌套展示在后续教程会重新定义一个新的专用接口来实现

  • create时通过findByIds为新增文章出查询关联的分类
  • update时通过addAndRemove更新文章关联的分类
  • 查询时通过.buildBaseQuery().leftJoinAndSelect为文章数据添加上关联的评论

控制器

新增两个控制器,分别用于处理分类和评论的请求操作

CategoryContoller

方法与PostController一样,index,show,store,update,destory

暂时直接用findTrees查询出树形列表即可

export class CategoryController {   ...     @Get()     async index() {         return this.categoryService.findTrees();     } } 

CommentController

目前评论控制器只有两个方法storedestory,分别用于新增和删除评论

注册代码

分别在entities,repositories,dtos,services,controllers等目录的index.ts文件中导出新增代码以给ContentModule进行注册

const entities = Object.values(EntityMaps); const repositories = Object.values(RepositoryMaps); const dtos = Object.values(DtoMaps); const services = Object.values(ServiceMaps); const controllers = Object.values(ControllerMaps); @Module({     imports: [         TypeOrmModule.forFeature(entities),         // 注册自定义 Repository         CoreModule.forRepository(repositories),     ],     controllers,     providers: [...dtos, ...services],     exports: [         // 导出自定义 Repository,以供其它模块使用         CoreModule.forRepository(repositories),         ...services,     ], }) export class ContentModule {} 

开发王者荣耀的团队,纯开发人员大概多少人?

Posted: 09 Jul 2022 02:52 PM PDT

好奇一个大项目的规模,如果只考虑 ios 平台

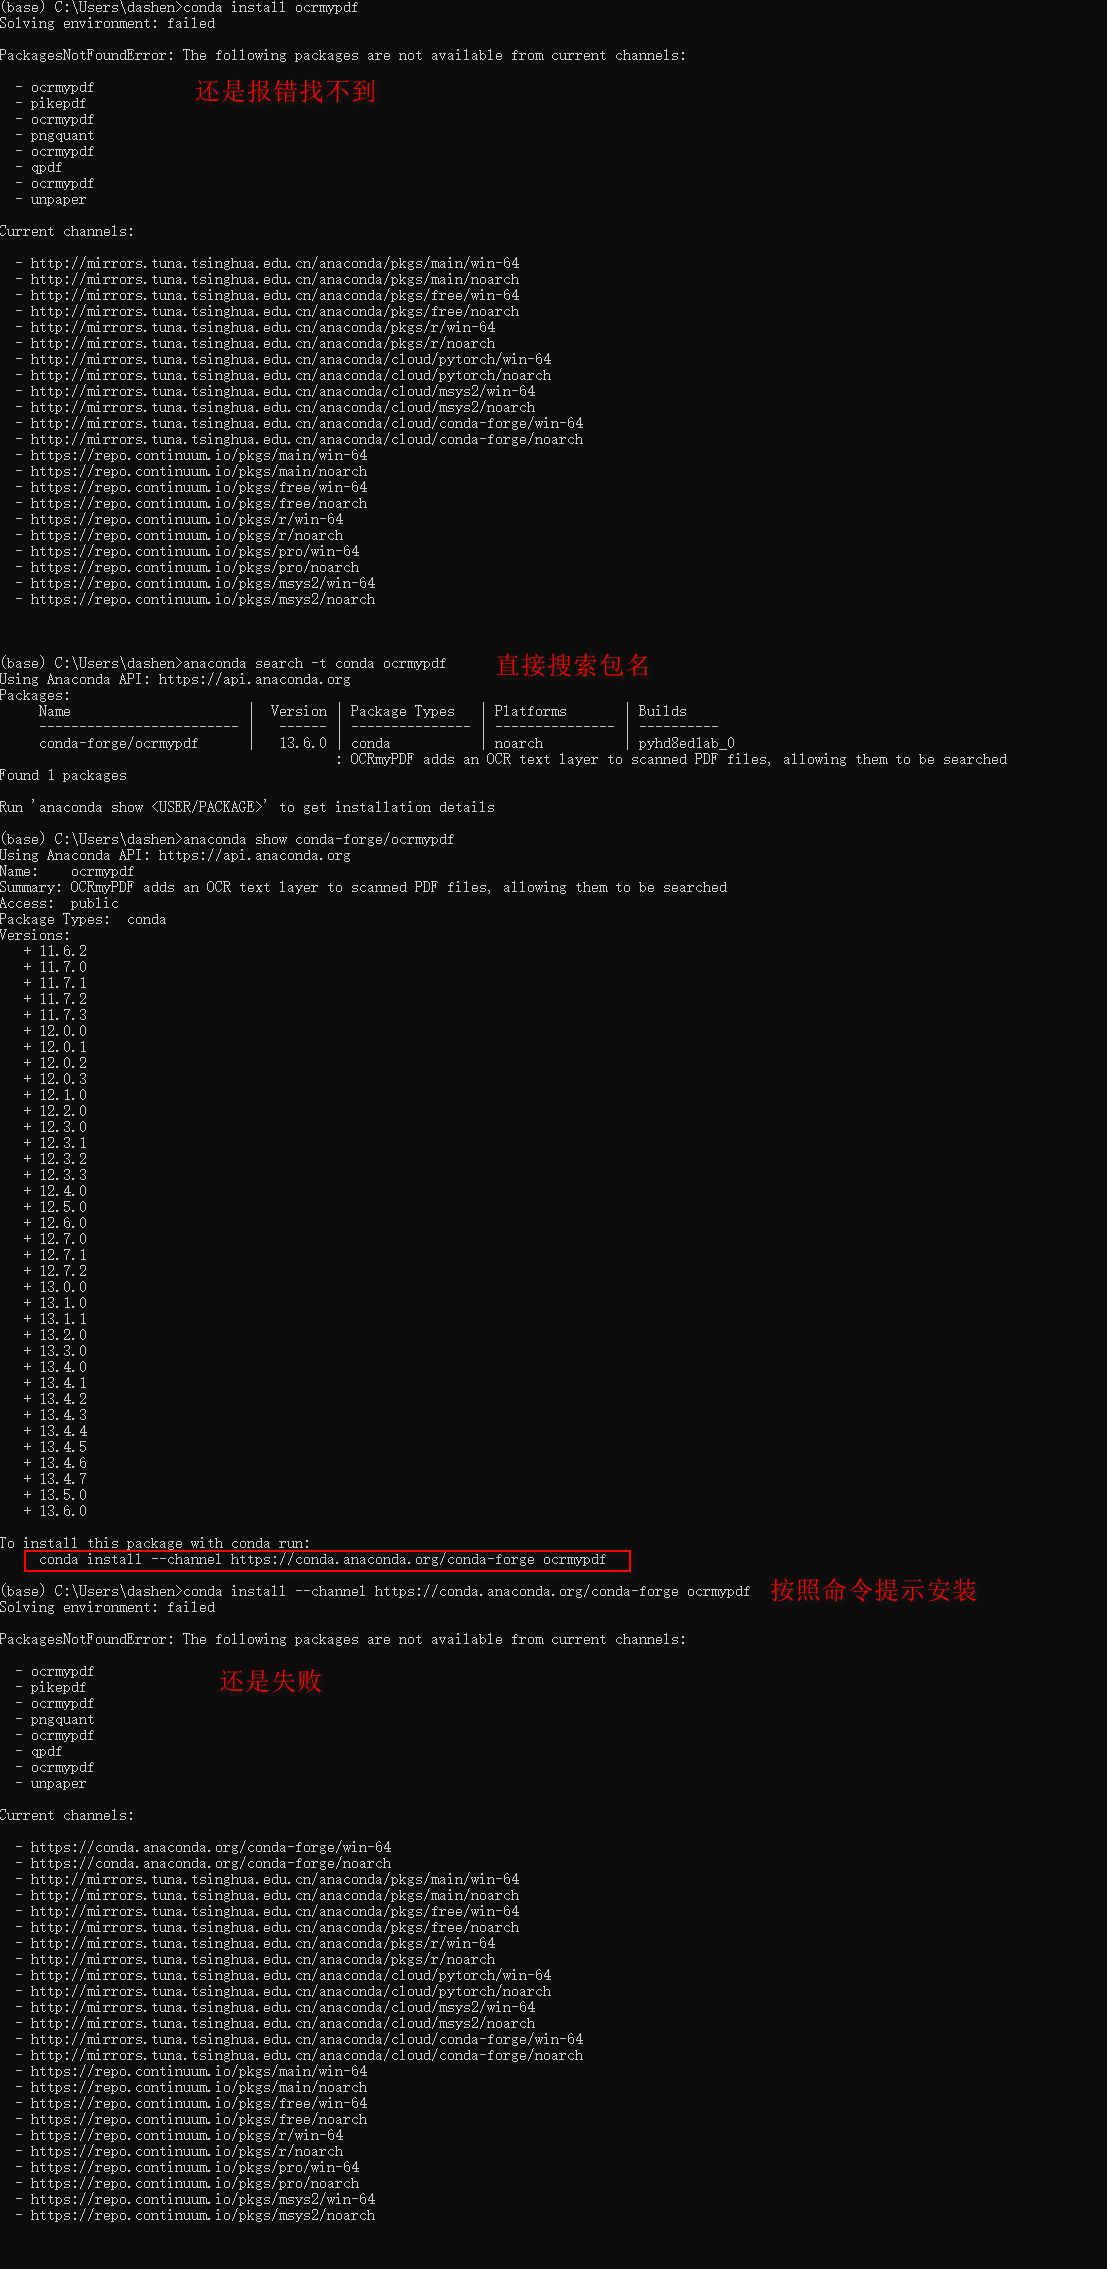
anaconda 安装第三方库总是失败

Posted: 09 Jul 2022 01:25 PM PDT

大佬们,求助呀。

Windows 环境。已经搞了半天了。目前.condarc 里的内容已经为:

ssl_verify: true show_channel_urls: true  channels:   - http://mirrors.tuna.tsinghua.edu.cn/anaconda/pkgs/main/win-64   - http://mirrors.tuna.tsinghua.edu.cn/anaconda/pkgs/free/win-64   - http://mirrors.tuna.tsinghua.edu.cn/anaconda/pkgs/r   - http://mirrors.tuna.tsinghua.edu.cn/anaconda/cloud/pytorch/   - http://mirrors.tuna.tsinghua.edu.cn/anaconda/cloud/msys2   - http://mirrors.tuna.tsinghua.edu.cn/anaconda/cloud/conda-forge   - defaults 

网上说,一定是 http ,不是 https 。所以内容里都是 http 。

上面两条试了都不好使,以及开着翻墙软件的组合,也不好使。

使用 aws- Java -sdk-s3 怎么 aws s3 上断点下载文件,那里有比较好的例子吗?

Posted: 09 Jul 2022 01:02 PM PDT

下载文件原先使用下面的代码:

S3Object object = s3.getObject(bucketName, fileKey);         S3ObjectInputStream objectContent = object.getObjectContent();         OutputStream out =null;         try {             response.setCharacterEncoding("utf-8");             response.setContentType("multipart/form-data");             response.setHeader("Content-Disposition",                     "attachment;fileName=" + FileUtils.setFileDownloadHeader(request, downloadName));             out = response.getOutputStream();             byte[] buf = new byte[1024];             int len;             while ((len = objectContent.read(buf)) > 0) {                 out.write(buf, 0, len);             }             response.flushBuffer(); 

s3 内有这么一个方法可以获取文件某一断数据:

etObjectRequest rangeRequest = new GetObjectRequest(bucketName, fileKey)                 .withRange(start, end);         S3Object object = s3.getObject(rangeRequest);         S3ObjectInputStream objectContent = object.getObjectContent(); 

如果下载了某段数据,怎么整合起来形成一个完整文件? 思路应该是下载各个分片合并,或在某个临时文件后面追加内容?哪里有比较完整的代码吗?希望各位朋友能够帮忙解答

GPL 协议开源项目在被社区完善后发布收费闭源的商业版或转闭源需要为贡献者支付报酬吗?

Posted: 09 Jul 2022 12:15 PM PDT

SCF(Serverless)是不是不适合提供 Web 类服务啊

Posted: 09 Jul 2022 10:37 AM PDT

之前腾讯云函数说要收费的时候上车了香港三块钱三年那个包,买完一直在闲置,最近准备迁上去点 Web 服务,发现好像对外 Web 服务(出 /入方向流量)还有另外的收费( EIP/APIGW ),是 scf 只适合做一些签到脚本一类的吗?


另:求推荐 scf 好玩的项目。

go 有没有比较合适的异常处理流程方案

Posted: 09 Jul 2022 10:32 AM PDT

新转 go ,发现接的项目的错误都是这种模式,并且出现次数极多: data, err:= xxx.xxx if err != nil { log.xxx return xxx,err }

有没有 java 那种,只要在业务逻辑里面: throw XxxException

然后在最外层有一个统一的方法拦截全部 RuntimeException 的方式来处理异常流的方法么? exceptionHandler(XxxException xxx){ ... }

多条件的组合查询在程序编写逻辑上是排列组合完成的么?

Posted: 09 Jul 2022 10:02 AM PDT

比如一组数据由件号,描述,型号,供应商等多元素组成,可以单一通过件号查询,也可以通过件号+型号查询,甚至可以描述+型号+供应商查询。在设计逻辑上,是通过排列组合考虑所有可能性吗?

随着可能会查询用到的元素数量增多,除了写得又臭又长,又觉得特别容易错漏

业余爱好开发者,抱歉

Nestjs 最佳实践教程:2 基本数据操作

Posted: 09 Jul 2022 08:41 AM PDT

学习目标

  • 简单地整合nestjs框架与typeorm
  • 实现基本的CRUD数据操作
  • 使用class-validator验证请求数据
  • 更换更加快速的fastify适配器
  • 使用 Thunder Client 对测试接口

安装 Mysql

实际生产环境中建议使用 PostgreSQL,因为教程以学习为主,所以直接使用相对来说比较通用和简单的 Mysql

使用以下命令安装 Mysql

如果本机不是使用 linux(比如使用 wsl2),请到mysql官网点击 download 按钮下载安装包后在 chrome 查看下载地址,然后在开发机用wget下载

如果本机使用 MacOS,使用brew install mysql,如果本机使用 Arch 系列,使用sudo pacman -Syy mysql

# 下载镜像包 cd /usr/local/src sudo wget sudo wget https://repo.mysql.com/mysql-apt-config_0.8.22-1_all.deb # 添加镜像(其它选项不用管,直接 OK 就可以) sudo apt-get install ./mysql-apt-config_0.8.22-1_all.deb # 升级包列表 sudo apt-get update # 开始安装,输入密码后,有一个密码验证方式,因为是开发用,所以选择第二个弱验证即可 sudo apt-get install mysql-server  # 初始化,在是否加载验证组件时选择 No,在是否禁用远程登录时也选择 No sudo mysql_secure_installation # 因为是远程 SSH 连接开发所以需要开启远程数据库链接,如果是本地或者 wsl2 则不需要开启 mysql -u root -p  CREATE USER 'root'@'%' IDENTIFIED BY '密码'; GRANT ALL PRIVILEGES ON *.* TO 'root'@'%' WITH GRANT OPTION; FLUSH PRIVILEGES; 

接着使用 Navicat 等客户端就可以连接了

预装依赖

~ pnpm add class-transformer \   @nestjs/platform-fastify \   class-validator \   lodash \   @nestjs/swagger \   fastify-swagger \   mysql2 \   typeorm \   @nestjs/typeorm   ~ pnpm add @types/lodash cross-env @types/node typescript -D 

生命周期

要合理的编写应用必须事先了解清楚整个程序的访问流程,本教程会讲解如何一步步演进每一次访问流,作为第一步课时,我们的访问流非常简单,可以参考下图

文件结构

我们通过整合typeorm来连接 mysql 实现一个基本的 CRUD 应用,首先我们需要创建一下文件结构

建议初学者手动创建,没必要使用 CLI 去创建,这样目录和文件更加清晰

  1. 创建模块
  2. 编写模型
  3. 编写 Repository(如果有需要的话)
  4. 编写数据验证的 DTO
  5. 编写服务
  6. 编写控制器
  7. 在每个以上代码各自的目录下建立一个index.ts并导出它们
  8. 在各自的Module里进行注册提供者,导出等
  9. AppModule中导入这两个模块

编写好之后的目录结构如下

. ├── app.module.ts                           # 引导模块            ├── config                                  # 配置文件目录 │   ├── database.config.ts                  # 数据库配置 │   └── index.ts ├── main.ts                                 # 应用启动器 ├── modules     ├── content                             # 内容模块目录     │   ├── content.module.ts               # 内容模块     │   ├── controllers                     # 控制器     │   ├── dtos                            # DTO 访问数据验证     │   ├── entities                        # 数据实体模型     |   ├── index.ts                   │   ├── repositories                    # 自定义 Repository     │   ├── services                        # 服务     └──  core         ├── constants.ts                    # 常量         ├── core.module.ts                  # 核心模块         ├── decorators                      # 装饰器         └── types.ts                        # 公共类型 

应用编码

在开始编码之前需要先更改一下package.jsonnestjs-cli.json两个文件

package.json中修改一下启动命令,以便每次启动可以自动配置运行环境并兼容windows环境

"prebuild": "cross-env rimraf dist", "start": "cross-env NODE_ENV=development nest start", "start:dev": "cross-env NODE_ENV=development nest start --watch", "start:debug": "cross-env NODE_ENV=development nest start --debug --watch", "start:prod": "cross-env NODE_ENV=production node dist/main", 

为了在每次重新编译前自动删除上次的产出,在nestjs-cli.json中配置 "deleteOutDir": true

main.ts

把适配器由express换成更快的fastify,并把监听的 IP 改成0.0.0.0方便外部访问.为了在使用class-validatorDTO类中也可以注入 nestjs 容器的依赖,需要添加useContainer

// main.ts import { NestFactory } from '@nestjs/core'; import {   FastifyAdapter,   NestFastifyApplication, } from '@nestjs/platform-fastify'; import { useContainer } from 'class-validator'; import { AppModule } from './app.module';  async function bootstrap() {   const app = await NestFactory.create<NestFastifyApplication>(     AppModule,     new FastifyAdapter()   );   useContainer(app.select(AppModule), { fallbackOnErrors: true });   await app.listen(3000,'0.0.0.0'); } bootstrap(); 

连接配置

创建一个src/config/database.config.ts文件

export const database: () => TypeOrmModuleOptions = () => ({     // ...     // 此处 entites 设置为空即可,我们直接通过在模块内部使用`forFeature`来注册模型     // 后续魔改框架的时候,我们会通过自定义的模块创建函数来重置 entities,以便给自己编写的 CLI 使用     // 所以这个配置后面会删除     entities: [],      // 自动加载模块中注册的 entity     autoLoadEntities: true,     // 可以在开发环境下同步 entity 的数据结构到数据库     // 后面教程会使用自定义的迁移命令来代替,以便在生产环境中使用,所以以后这个选项会永久 false     synchronize: process.env.NODE_ENV !== 'production', });  

CoreModule

核心模块用于挂载一些全局类服务,比如整合typeorm的``TypeormModule`

注意: 这里不要使用@Global()装饰器来构建全局模块,因为后面在CoreModule类中添加一些其它方法

返回值中添加global: true来注册全局模块,并导出metadata.

// src/core/core.module.ts export class CoreModule {     public static forRoot(options?: TypeOrmModuleOptions) {         const imports: ModuleMetadata['imports'] = [TypeOrmModule.forRoot(options)];         return {             global: true,             imports,             module: CoreModule,         };     } } 

AppModule导入该模块,并注册数据库连接

// src/app.module.ts @Module({     imports: [CoreModule.forRoot(database())],   ... }) export class AppModule {} 

自定义存储类

由于原来用于自定义 Repository 的@EntityRepositorytypeorm0.3 版本后已经不可用,特别不方便,所以根据这里的示例来自定义一个CustomRepository装饰器

// src/modules/core/constants.ts // 传入装饰器的 metadata 数据标识 export const CUSTOM_REPOSITORY_METADATA = 'CUSTOM_REPOSITORY_METADATA';  // src/modules/core/decorators/repository.decorator.ts // 定义装饰器 import { CUSTOM_REPOSITORY_METADATA } from '../constants'; export const CustomRepository = <T>(entity: ObjectType<T>): ClassDecorator =>     SetMetadata(CUSTOM_REPOSITORY_METADATA, entity);  // src/modules/core/decorators/index.ts export * from './repository.decorator'; 

定义静态方法用于注册自定义 Repository

 public static forRepository<T extends Type<any>>(         repositories: T[],         dataSourceName?: string,     ): DynamicModule {         const providers: Provider[] = [];          for (const Repo of repositories) {             const entity = Reflect.getMetadata(CUSTOM_REPOSITORY_METADATA, Repo);              if (!entity) {                 continue;             }              providers.push({                 inject: [getDataSourceToken(dataSourceName)],                 provide: Repo,                 useFactory: (dataSource: DataSource): typeof Repo => {                     const base = dataSource.getRepository<ObjectType<any>>(entity);                     return new Repo(base.target, base.manager, base.queryRunner);                 },             });         }          return {             exports: providers,             module: CoreModule,             providers,         };     } 

ContentModule

内容模块用于存放CRUD操作的逻辑代码

// src/modules/content/content.module.ts @Module({}) export class ContentModule {} 

AppModule中注册

// src/app.module.ts @Module({     imports: [CoreModule.forRoot(database()),ContentModule],   ... }) export class AppModule {} 

实体模型

创建一个PostEntity用于文章数据表

PostEntity继承``BaseEntity,这样做是为了我们可以进行ActiveRecord操作,例如PostEntity.save(post),因为纯DataMapper`的方式有时候代码会显得啰嗦,具体请查看此处

@CreateDateColumn @UpdateDateColumn是自动字段,会根据创建和更新数据的时间自动产生,写入后不必关注

// src/modules/content/entities/post.entity.ts // 'content_posts'是表名称 @Entity('content_posts') export class PostEntity extends BaseEntity { ...     @CreateDateColumn({         comment: '创建时间',     })     createdAt!: Date;      @UpdateDateColumn({         comment: '更新时间',     })     updatedAt!: Date; } 

存储类

本节存储类是一个空类,后面会添加各种操作方法

这里用到我们前面定义的自定义 CustomRepository 装饰器

// src/modules/content/repositories/post.repository.ts @CustomRepository(PostEntity) export class PostRepository extends Repository<PostEntity> {} 

注册模型和存储类

在编写好entityrepository之后我们还需要通过Typeorm.forFeature这个静态方法进行注册,并把存储类导出为提供者以便在其它模块注入

// src/modules/content/content.module.ts @Module({     imports: [         TypeOrmModule.forFeature([PostEntity]),         // 注册自定义 Repository         CoreModule.forRepository([PostRepository]),     ],      exports: [         // 导出自定义 Repository,以供其它模块使用         CoreModule.forRepository([PostRepository]),     ], }) export class ContentModule {} 

DTO 验证

DTO配合管道(PIPE)用于控制器的数据验证,验证器则使用class-validator

class-validator 是基于 validator.js 的封装,所以一些规则可以通过 validator.js 的文档查找,后面教程中我们会编写大量的自定义的验证规则,这节先尝试基本的用法

其基本的使用方法就是给DTO类的属性添加一个验证装饰器,如下

groups选项用于配置验证组

// src/modules/content/dtos/create-post.dto.ts @Injectable() export class CreatePostDto {     @MaxLength(255, {         always: true,         message: '文章标题长度最大为$constraint1',     })     @IsNotEmpty({ groups: ['create'], message: '文章标题必须填写' })     @IsOptional({ groups: ['update'] })     title!: string;     ... }  

更新验证类UpdatePostDto继承自CreatePostDto,为了使CreatePostDto中的属性变成可选,需要使用[@nestjs/swagger][]包中的PartialType方法,请查阅此处文档

// src/modules/content/dtos/update-post.dto.ts @Injectable() export class UpdatePostDto extends PartialType(CreatePostDto) {     @IsUUID(undefined, { groups: ['update'], message: '文章 ID 格式错误' })     @IsDefined({ groups: ['update'], message: '文章 ID 必须指定' })     id!: string; }  

服务类

服务一共包括 5 个简单的方法,通过调用PostRepository来操作数据

// src/modules/content/services/post.service.ts @Injectable() export class PostService {     // 此处需要注入`PostRepository`的依赖     constructor(private postRepository: PostRepository) {}     // 查询文章列表     async findList()      // 查询一篇文章的详细信息     async findOne(id: string)     // 添加文章     async create(data: CreatePostDto)     // 更新文章     async update(data: UpdatePostDto)     // 删除文章     async delete(id: string) }  

控制器

控制器的方法通过@GET,@POST,@PUT,@PATCH,@Delete等装饰器对外提供接口,并且通过注入PostService服务来操作数据.在控制器的方法上使用框架自带的ValidationPipe管道来验证请求中的body数据,ParseUUIDPipe来验证params数据

// 控制器 URL 的前缀 @Controller('posts') export class PostController {     constructor(protected postService: PostService) {}      ...    // 其它方法请自行查看源码     @Get(':post')     async show(@Param('post', new ParseUUIDPipe()) post: string) {         return this.postService.findOne(post);     }      @Post()     async store(         @Body(             new ValidationPipe({                 transform: true,                 forbidUnknownValues: true,                 // 不在错误中暴露 target                 validationError: { target: false },                 groups: ['create'],             }),         )         data: CreatePostDto,     ) {         return this.postService.create(data);     } } 

注册控制器等

  • 为了后面``DTO中可能会导入服务,需要把DTO,同样注册为提供者并且改造一下main.ts,把容器加入到class-containter`中
  • PostService服务可能后续会被UserModule等其它模块使用,所以此处我们也直接导出
// src/modules/content/content.module.ts @Module({     imports: [         TypeOrmModule.forFeature([PostEntity]),         // 注册自定义 Repository         CoreModule.forRepository([PostRepository]),     ],     providers: [PostService, CreatePostDto, UpdatePostDto],     controllers: [PostController],     exports: [         PostService,         // 导出自定义 Repository,以供其它模块使用         CoreModule.forRepository([PostRepository]),     ], }) export class ContentModule {} 
// src/main.ts ... async function bootstrap() {     const app = await NestFactory.create<NestFastifyApplication>(         AppModule,         new FastifyAdapter(),     );     useContainer(app.select(AppModule), { fallbackOnErrors: true });     await app.listen(3000, '0.0.0.0'); } 

最后启动应用在Thunder Client中测试接口

想问下前端业务做多了,怎么提升自己技术

Posted: 09 Jul 2022 08:06 AM PDT

Nestjs 最佳实践教程-1 编码环境搭建

Posted: 09 Jul 2022 06:50 AM PDT

注意: 为了兼顾大多数用户,本教程使用远程 SSH 连接 Debian 服务器进行讲解,同时会给出 MacOS 的命令,windows 本地开发者请自行安装 wsl2 作为替代

学习目标

  • 安装与配置node.js+pnpm环境
  • 配置tsconfig.json+eslint+prettier实现代码规范化
  • 配置vscode实现调试与在保存代码时自动运行eslint+prettier
  • 配置lanunch.json进行应用调试
  • 安装Thunder Client插件进行接口调试

环境搭建

安装与配置node.js环境

MacOS 请使用 brew 安装,如果没有安装brew请先安装

建议:安装到 GLOBAL 里面的东西统一使用一个包管理器,我这里使用pnpm

安装node.js

# 下载并解压 node ~ sudo wget https://nodejs.org/dist/v18.4.0/node-v18.4.0-linux-x64.tar.xz -O /usr/local/src/node18.tar.xz ~ sudo tar -xf /usr/local/src/node18.tar.xz -C /usr/local/ ~ sudo mv /usr/local/node-v18.4.0-linux-x64 /usr/local/node # 添加到环境变量 echo "export PATH=/usr/local/node/bin:\$PATH" >> ~/.zshrc && source ~/.zshrc 

配置npm淘宝镜像

~ npm config set registry https://registry.npmmirror.com/ 

安装pnpm以及初始化 pnpm

~ npm install -g pnpm ~ pnpm setup && source .zshrc 

配置pnpm淘宝镜像

~ pnpm config set registry https://registry.npmmirror.com/ 

安装镜像管理工具

~ pnpm add nrm -g  

建议安装一个node版本管理工具比如n或者nvm

因为我们使用普通用户编程,所以把 n 的目录通过环境变量改成我们可以操作的目录

~ pnpm add n -g  ~ echo "\nexport N_PREFIX=\$HOME/.n" >> ~/.zshrc ~ echo "export PATH=\$N_PREFIX/bin:\$PATH" >> ~/.zshrc ~ source ~/.zshrc # 安装最新的长期支持版 ~ n lts_latest && node --version # 切换回最新版 ~ n latest && node --version 

安装nestjs cli

~ pnpm add @nestjs/cli -g 

创建项目,我们命名为 nestplus

这一步如果出现错误就进入nestplus目录,手动pnpm i一下

~ nest new nestplus # 创建的时候选择 pnpm 

升级所有包到最新版本

~ pnpm up -latest 

这是会报缺少peer 建议依赖webpack的警告,把下面这段添加到package.json中就可以了

 "pnpm": {     "peerDependencyRules": {       "ignoreMissing": [         "webpack"       ]     }   } 

代码规范化

具体代码与配置请自行查看源代码

代码风格

配置airbnb的 eslint 规则并整合prettier,并且经过一定的客制化同时配合 vscode 可达到完美的编码体验

pnpm add typescript \ eslint \ prettier \ @typescript-eslint/parser \ @typescript-eslint/eslint-plugin \ eslint-config-airbnb-base \ eslint-config-airbnb-typescript \ eslint-config-prettier \ eslint-plugin-import \ eslint-plugin-prettier \ eslint-plugin-unused-imports \ eslint-plugin-unused-imports \ prettier-plugin-organize-imports \ eslint-plugin-jest -D 

配置内容

... plugins: ['@typescript-eslint', 'jest', 'prettier', 'import', 'unused-imports'], extends: [     // airbnb 规范     'airbnb-base',     // 兼容 typescript 的 airbnb 规范     'airbnb-typescript/base',     // typescript 的 eslint 插件     'plugin:@typescript-eslint/recommended',     'plugin:@typescript-eslint/recommended-requiring-type-checking',      // 支持 jest     'plugin:jest/recommended',     // 使用 prettier 格式化代码     'prettier',     // 整合 typescript-eslint 与 prettier     'plugin:prettier/recommended', ], 

一些重要的规则

其余配置自行查看代码

设置解析文件为tsconfig.eslint.json(我们在[Tsconfig 配置](#Tsconfig 配置)部分新增这个文件)

parserOptions: {     project: 'tsconfig.eslint.json',     tsconfigRootDir: __dirname,     ecmaVersion: 'latest',     sourceType: 'module', }, 

eslint-plugin-unused-imports用于自动删除未使用的导入

...  'no-unused-vars': 0,  '@typescript-eslint/no-unused-vars': 0,  'unused-imports/no-unused-imports': 1,  'unused-imports/no-unused-vars': [     'error',     {         vars: 'all',         args: 'none',         ignoreRestSiblings: true,     }, ] 

import插件,import/order可以按照自己的需求配置

// 导入模块的顺序 'import/order': [      'error',      {          pathGroups: [              {                  pattern: '@/**',                  group: 'external',                  position: 'after',              },          ],          alphabetize: { order: 'asc', caseInsensitive: false },          'newlines-between': 'always-and-inside-groups',          warnOnUnassignedImports: true,      }, ], // 导入的依赖不必一定要在 dependencies 的文件 'import/no-extraneous-dependencies': [     'error',      {          devDependencies: [              '**/*.test.{ts,js}',              '**/*.spec.{ts,js}',              './test/**.{ts,js}',              './scripts/**/*.{ts,js}',          ],      }, ], 

接下来需要配置一下.prettierrc,和.editorconfig,并且把一些它们各自需要忽略的目录和文件分别添加到.eslintignore.prettierignore

最后把git仓库需要忽略的目录和文件写入.gitignore

Tsconfig 配置

tsconfig.json文件中添加ESNEXT就可以使用最新的 ES 语法,并且添加一个@作为根目录映射符

{     "compilerOptions": {         // ...         "paths": {             "@/*": ["src/*"]         }     },      "include": ["src", "test", "typings/**/*.d.ts"] } 

在跟目录添加一个tsconfig.eslint.json文件,供eslint使用

{     "extends": "./tsconfig.json",     "includes": ["src", "test", "typings/**/*.d.ts", "**.js"] } 

tsconfig.build.json 中排除**.js

{     "extends": "./tsconfig.json",     "exclude": ["node_modules", "dist", "test", "**/*spec.ts"] } 

开发工具

对于node.js,typescript,前端等技术最好的开发工具毋庸置疑的就是vscode,任何其它选项(包括 vim,emacs,sublime text,atom,webstorm 等等)都有这样那样的问题需要去耗费精力,所以建议直接使用 VScode 进行开发

VSCode 已经自带同步配置和插件的功能,建议启用

安装vscode

Windows 直接点击安装包就可以,需要注意的是如果是 WSL2 或远程 SSH 开发,需要在远程再一次安装插件

~ brew install vscode 

安装eslint插件和prettier插件

~ code --install-extension dbaeumer.vscode-eslint \   && code esbenp.prettier-vscode 

cmd+,选择偏好设置->工作空间,配置eslint插件

{     "editor.formatOnSave": false,     "editor.codeActionsOnSave": {         "source.fixAll.eslint": true     } } 

shift+cmd+d创建lanunch.json,并且使用ts-node+tsconfig-paths配置断点调试,打好断点,按F5就可以进行调试

这种调试方式适合简单使用,后续我们将会讲到 jest 测试调试,这样效果会更好

{     // 使用 IntelliSense 了解相关属性。     // 悬停以查看现有属性的描述。     // 欲了解更多信息,请访问: https://go.microsoft.com/fwlink/?linkid=830387     "version": "0.2.0",     "configurations": [         {             "name": "debug nestplus",             "request": "launch",             "runtimeArgs": ["run-script", "start:debug"],             "autoAttachChildProcesses": true,             "console": "integratedTerminal",             "runtimeExecutable": "pnpm",             "skipFiles": ["<node_internals>/**"],             "type": "pwa-node"         }     ] } 

最后安装Thunder Client用于接口测试,当然你也可以安装 postman

至此,所有配置完成,现在重启vscode就可以进入下一节学习如何愉快的使用nestjs构建应用了

有没有什么品牌的工控机, 想弄个放在家里当服务器?

Posted: 09 Jul 2022 05:25 AM PDT

主要是自己对硬件不太熟悉
直接买配置好的就行了

价格最好在 1000 元以内
能支持 wifi 连接就行

No comments:

Post a Comment